(650) 442-1470

 (650) 442-1470

Summary:
Bay Area fall plumbing prep is less about long freezes and more about heavy rain, localized flooding, and extra holiday water use. You should check exposed pipes and septic cleanout lids for leaks, drain outdoor faucets, clear gutters and storm drains, and test the sump pump and backup battery. For septic tanks, backflow preventers, water heaters, and repairs or upgrades, it’s best to schedule an appointment with a licensed plumber instead.
| Time to Read | ~10 Minutes |
| What You’ll Learn |
|
| Next Steps |
|
How Can I Prepare My Plumbing for the Fall?
Nothing says “fall is right around the corner” quite like the Bay Area’s morning fog clearing out faster and ads for pumpkin spice treats sprouting up all across the region. Then, just like that, summer is behind us, the rainy season is upon us, and it’s time for holiday hosting.
It’s a time of year that most locals look forward to, mostly because we’re lucky enough to still enjoy mild weather (at least compared to our northern neighbors). But that’s exactly why so many people falsely assume they don’t need to prepare their plumbing.
In reality, nothing could be further from the truth. Find out why, then get a simple early-season checklist to follow that’s full to the brim with our top recommendations, including plumbing inspections.
Watch: What Skipping Fall Prep Could Cost You
Most fall plumbing advice you’ll find online is written with Midwest or East Coast winters in mind. Around here, you might see your breath on only a handful of mornings each year, if that. What we typically see instead is heavy rain with localized flooding and the occasional cold snap.
The climate differences change maintenance needs in a few key ways:
- There’s less of a focus on protecting systems from months of ice and snow.
- Preparation is more about flood protection and general system reliability instead.
- Gutters may already be filled with leaves, dirt, and grit from the long, dry summer.
- Drains meant to carry away storm water can develop clogs that prevent proper flow.
- Water always follows the easiest path, whether that’s into your home or down the nearest hill.
- Once it starts to rain, an improperly maintained sump pump may fail completely.
- A single cold snap can turn a cracked pipe into a flooded kitchen, bathroom, or basement.
The stakes are even higher when you consider that failures like these tend to snowball once they start happening. A blocked drain or sewer can send water toward your foundation, overwhelm your sump pump, or even lead to a sewage backup that costs thousands to fix.
The short video below makes the takeaway clear: skip what seems like a minor problem or maintenance step now, and you could end up with an expensive disaster at the worst possible time.
The smell may be coming from a single sink, shower, tub, or floor drain that hasn’t been used in a while. In a pinch, you can try running some water into any rarely used drains to restore the water barrier that normally prevents it from wafting up, but give us a call if it doesn’t go away.
Your Complete Guide to Fall Plumbing Prep
Now that you know how quickly a small plumbing problem can snowball, the next step is figuring out what deserves your attention first. The interactive checklist below will walk you through the process and tell you exactly what’s safe to do on your own and when it’s better to call a pro.
To get the most from the checklist:
- Bookmark the page so you can come back to it later on as-needed
- Click the pills at the top to jump to a specific category as-needed
- Expand each one and use the “next” button to get step-by-step guidance
- Check out the diagrams and images so you know what you’re looking for
Need a copy you can carry around the house? Click “Print the whole checklist” to get a streamlined version that comes with dedicated space for product names, dates, special notes, and more. Oh, and don’t forget to share it with your family and friends in the area so they can get a helpful head start, too.
Click through each category below at your own pace, or print the whole checklist and go room by room.
When the weather becomes cold, leaks in pipes are usually the first thing to freeze over. The pipe itself may even explode completely if it stays cold for too long, because when water turns into ice, it typically expands.
- Run your hand along each length of pipe gently.
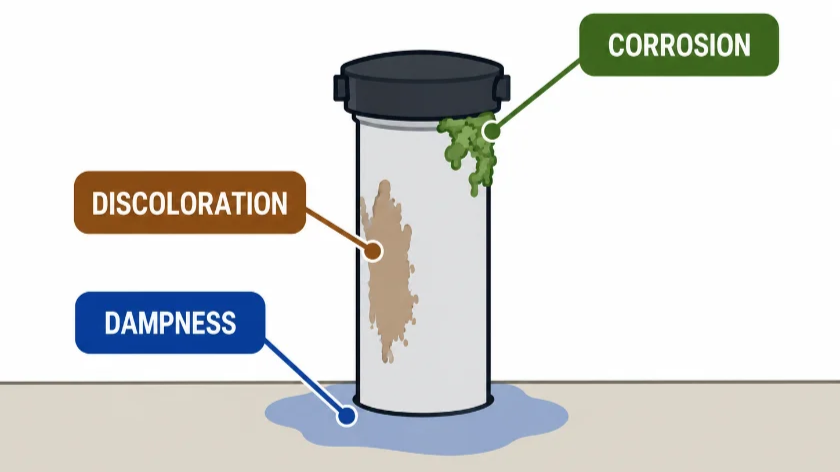
- If you notice any dampness, discoloration, or corrosion, you may have a leak.
- Photograph anything questionable, then give us a call right away for solutions.
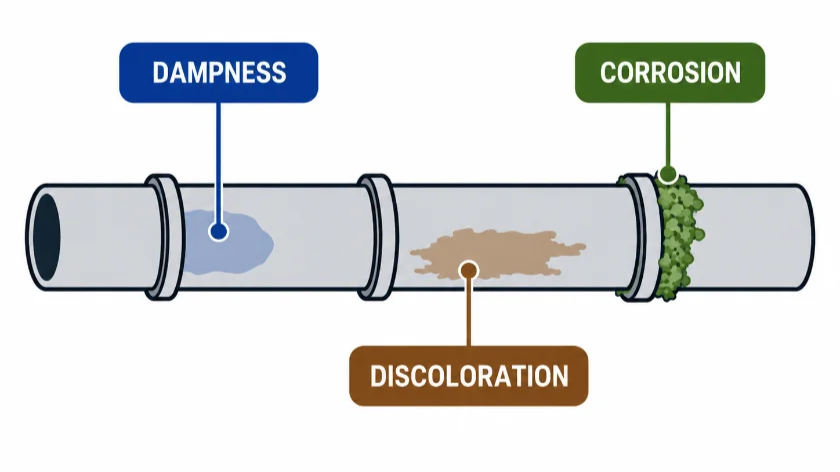
- Lift or check around each lid for dampness, discoloration, or corrosion.
- Look for the same signs you checked on the exposed pipes.
- This is another good time to take pictures of anything you find suspicious.
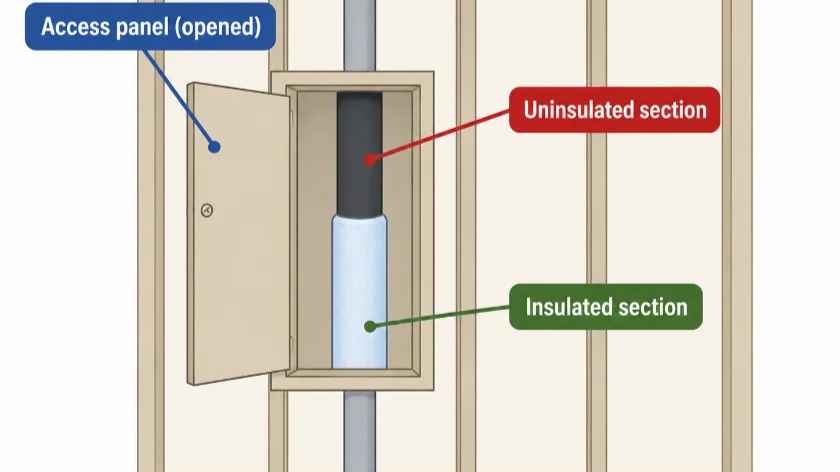
- Uninsulated lines in areas like these have a higher risk for freezing in the cold.
- If you still have any that aren't insulated yet, schedule a visit to get them wrapped.
- Plumbing insulation must meet strict regulations, so leave the job itself to a pro.
- See if you can trace the path of any pipes to walls that fit the criteria.
- If there's an access point or door in place, it's okay to open it up and take a peek.
- Try to confirm if there's any insulation between the pipe and the exterior wall itself.
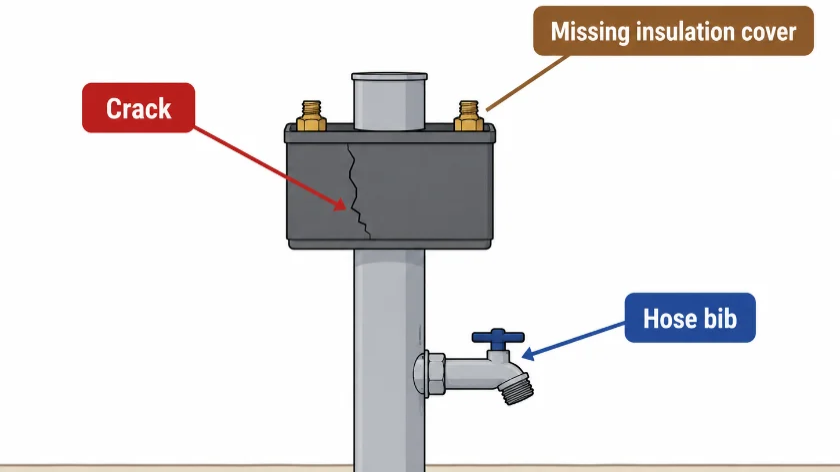
- Look for anything suspicious: cracks, kinks, or even just missing insulation covers.
- If you find any damage, stop there and give us a call to let us know.
- Don't try to resolve or correct this on your own, as you may cause a flood.
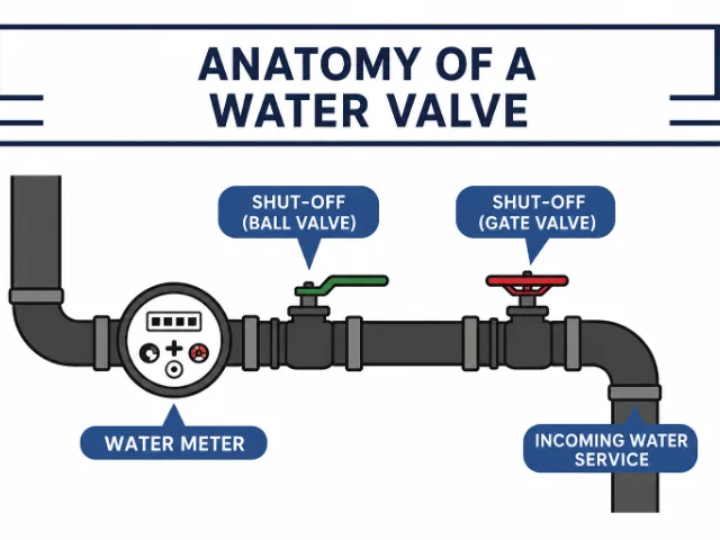
- Your shutoff valve will typically be somewhere near the incoming supply line.
- Turn it clockwise (to the right) until it stops to shut the water off.
- Turn it counter-clockwise (to the left) to turn the water back on.
Your septic tank needs regular maintenance to keep operating smoothly. Accessing an underground tank can be very difficult in the winter, especially if the ground freezes, so early fall is the perfect time to schedule an inspection. At Caccia, we have special equipment like infrared cameras that makes it easier to inspect both the tank itself and any lines attached to it without doing any digging. If a problem is identified during the call, we'll walk you through it and help you strategize to find the most affordable fix.
- The technician will first run an infrared camera system over the tank and connected lines.
- Next, they'll check the overall condition of the tank and measure the total depth of the contents inside.
- If it's time for repairs or cleaning, they'll let you know on the spot and help you make a plan to get it done.
- Slow drains, which can indicate that you have a clog somewhere in the system.
- Gurgling pipes, which can be a sign that air is blocking the flow of wastewater into the tank.
- Soggy patches over the tank or drain field, which might mean you have a crack, leak, or need the tank pumped out.
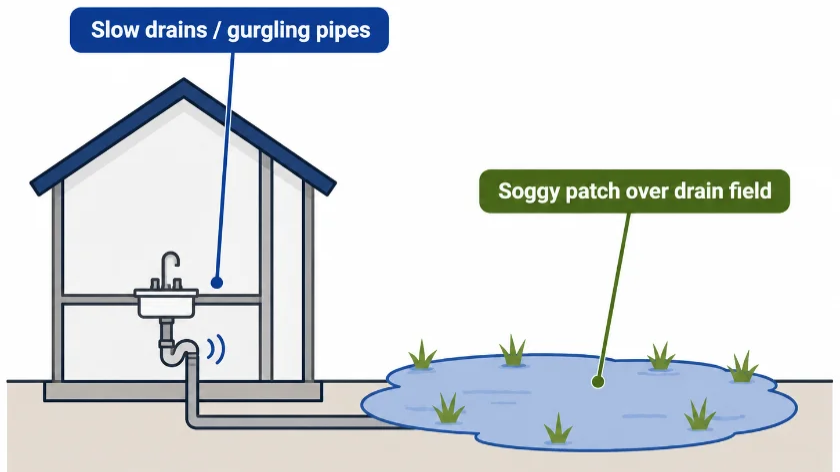
- The technician needs access to our pumping truck in order to clear out your septic tank.
- If they arrive in the truck for your inspection, they may be able to handle pumping on the same service call.
- If the truck is already out on another job, they'll book you in for a second appointment at a time that works for you.
- The scope typically includes waste removal, hydrojetting, a deeper internal inspection, and adding enzymes or chemicals to boost breakdown.
- Worn or missing baffles let solids escape into the drain field and do occasionally need to be replaced.
- They'll also evaluate whether the drain field itself is still absorbing fluids properly without flooding or sewage leaks.
- Both steps are typically handled during the same visit, but intensive repairs can take a bit more time.
Outdoor faucets, fixtures, and hose bibs are easy to overlook, but they're still a part of your plumbing. That's why you want to closely inspect them and get them ready for the upcoming drop in temperatures. The good news? This is one of the easiest steps on the list. In fact, you can handle just about everything in this section on your own, but we're always happy to take care of them for you so you can focus on what matters: work, family, and having fun.
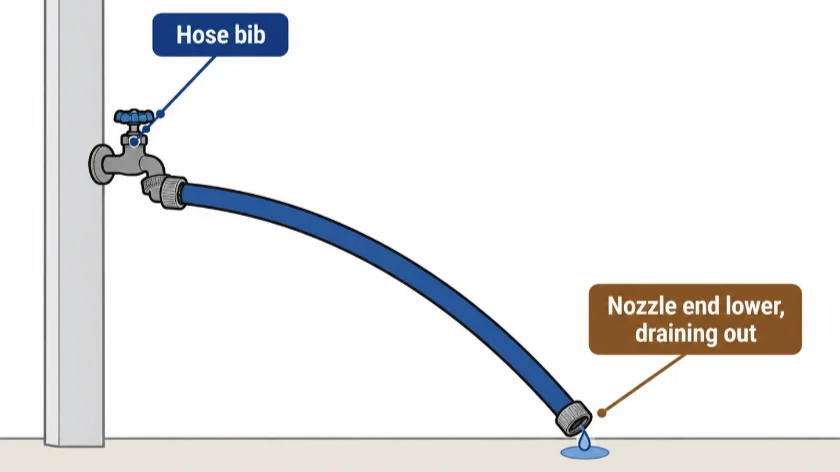
- Carefully remove all hoses from their fixtures, then lay them out with the nozzle end slightly lower than the spigot end.
- Let any remaining water completely drain out of them downhill until the flow stops completely. This should only take a few minutes.
- Coil up the empty hoses tightly and use a zip tie or small length of rope to keep them together, then store them in a protected area (like the garage).
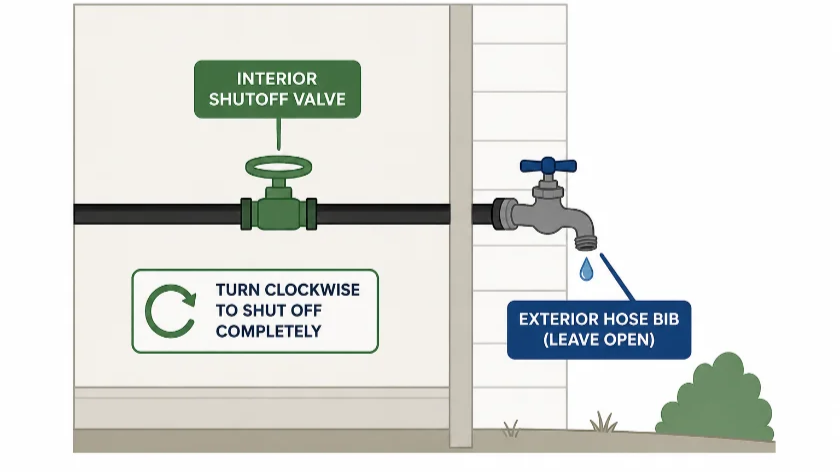
- Find the interior valve feeding the hose bib and turn it clockwise to shut it off completely.
- Leave the outdoor spigot itself open for a couple of hours to allow any remaining water to drain out.
- Keep the valve on the spigot itself open until you put the hose or device back on it in the spring.
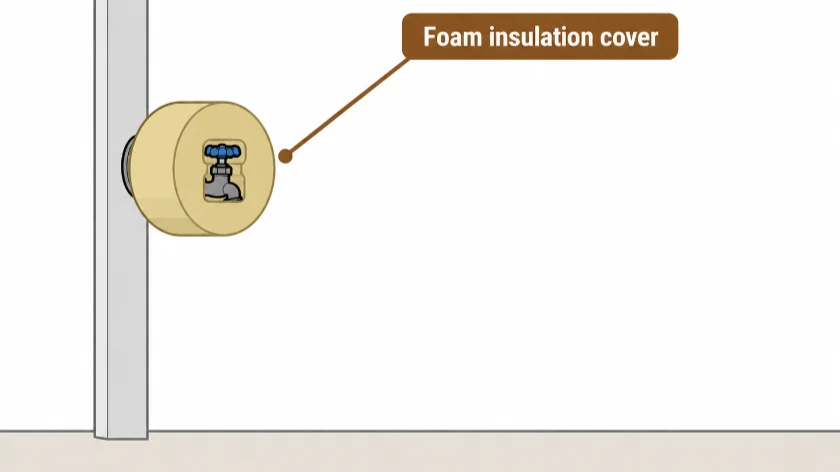
- Grab a foam insulation kit from your local hardware store or schedule a service call with Caccia instead.
- Most kits either snap on or screw down over the hose bib without the need for any special tools.
- Just make sure the spigot's fully drained first so you're not accidentally sealing any water inside it.
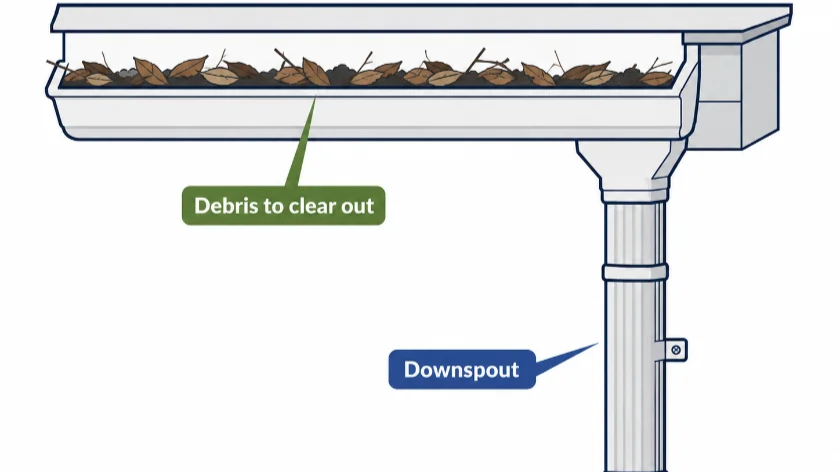
Gutters and drains do one job: move rainwater away from your home. When they're clogged, that water has nowhere to go but toward your foundation, crawl space, or sewer lateral instead. After a long, dry summer, it's common for gutters to be packed with leaves and grit, and for area drains to be clogged with dirt they've collected all season. Clear them out before the first real storm, and you'll avoid the kind of water damage that starts small and gets expensive fast.
- Scoop out debris either by hand or with a special gutter scoop. In a pinch, a large cup or funnel will also work.
- Use a garden hose to flush each downspout out completely and confirm that water flows all the way through without stopping.
- Save anything that requires getting up on the roof or using a tall ladder for a professional instead.
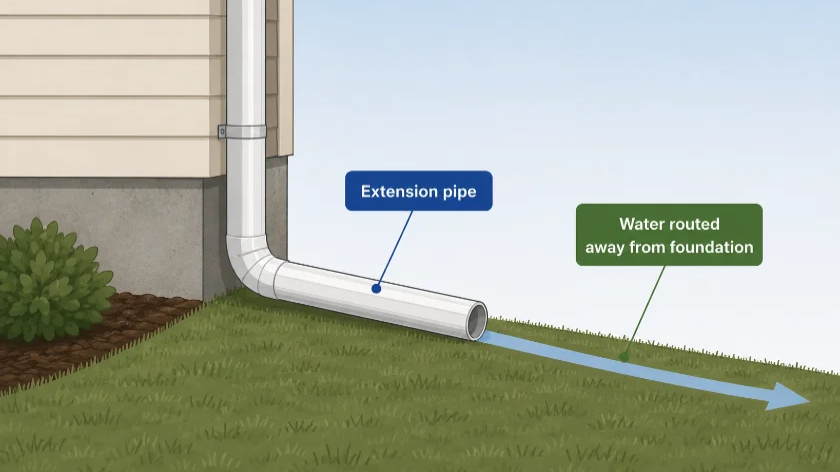
- Walk the perimeter of your home either during or immediately after a light rain.
- Watch closely and try to confirm where the water travels once it reaches the ground.
- If you notice pooling around exterior walls or your downspout, it may be worth adding an extension.
- Keep a log with pictures that show any spots that remain wet for more than a day or two.
- Drainage issues will often manifest as pools of water somewhere in your yard or driveway.
- Regrading or putting in a French drain is a common fix, but should always be handled by a pro.
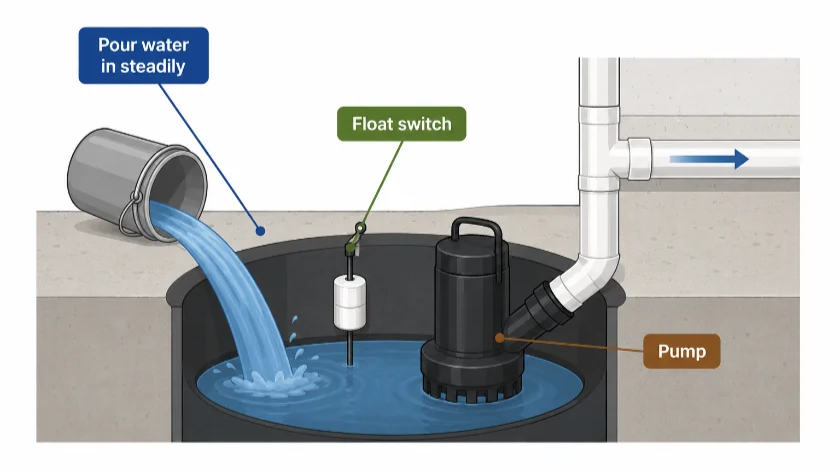
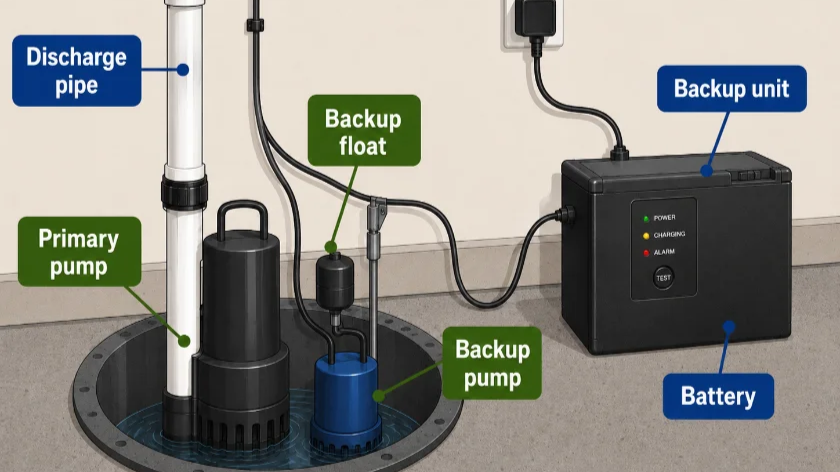
Your sump pump is the last line of defense between a heavy storm and a flooded basement or crawl space. Very often, they sit untouched and unused for months at time without producing any real symptoms even if there's an issue lurking deeper in the device. The worst possible time to discover a stuck float switch or dead battery backup is in the middle of a major storm or localized flooding. A quick inspection and testing in the fall is the best way to protect your home and the sump pump itself.
- Pour the water in at a steady pace rather than dumping it in all at once.
- You should hear a small shift or click if the float switch triggers correctly.
- The pump should turn on a few seconds later and rapidly empty all water out of the pit.
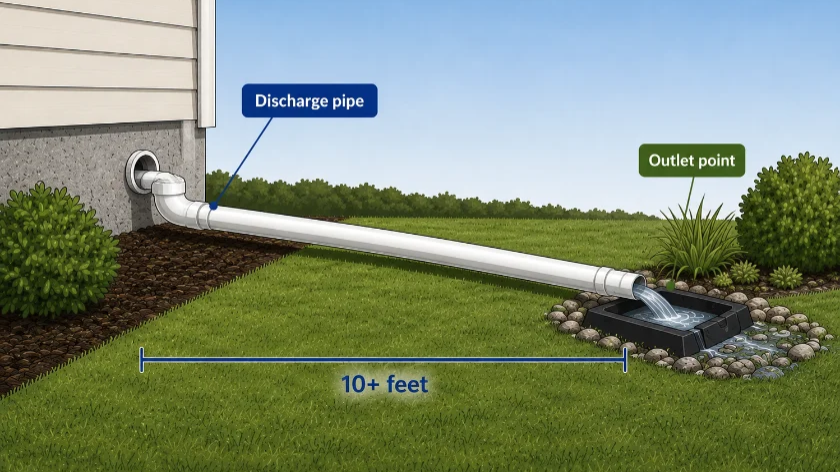
- Look for a PVC pipe exiting the house near the sump pit.
- You'll typically find the discharge pipe either low on an exterior wall or poking out of the ground nearby.
- Follow the path it travels to the point where it actually stops at a splash block, in your yard, or near a drain.
- Schedule an appointment to have an extension added if the total space between them is less than 10 feet.
- Unplug the pump and leave it unpowered for 30 seconds. Skip this and call us if it's actively flooding.
- If the battery backup doesn't kick in within less than a minute, it may need to be serviced.
- Plug the sump pump back in and make sure it's powered before you wrap up.
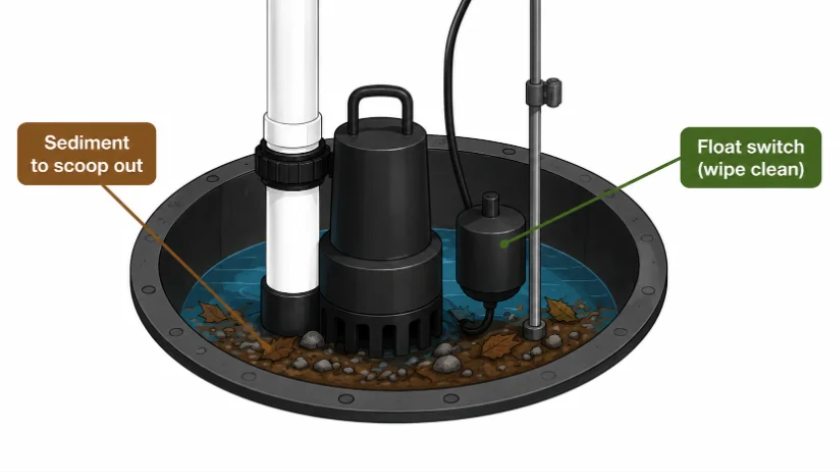
- Put on a pair of thick waterproof gloves and manually clear out the debris.
- Wipe down the float switch itself if your device provides direct access to it.
- If the pump is running nonstop, not running at a all, or making loud noises, give us a call for help.
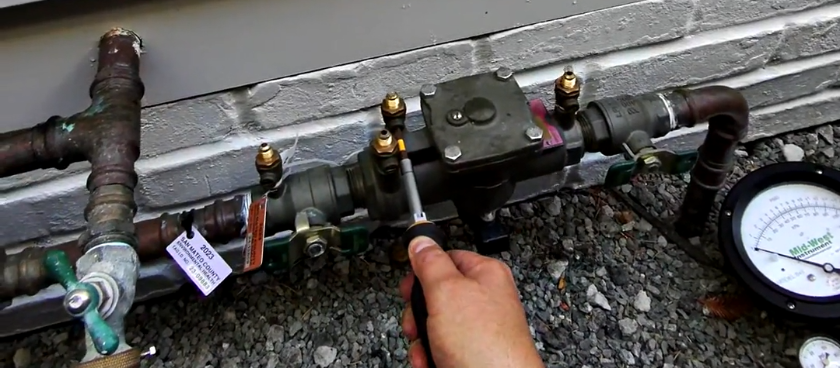
A backflow preventer keeps contaminated water from siphoning back into your home's clean water supply. Backflow happens when a sudden drop in water pressure pulls water backward through the line instead of forward, and it's often caused by a water main break or nearby firefighting efforts. County and agency regulations make it mandatory for you to have your backflow inspected and tested by a certified tester each year because contaminated water can introduce chemicals, bacteria, or even parasites like giardia into the drinking water supply. Fall is a great time to check this important maintenance task off your list.
- Look for it near your irrigation system's main shutoff or where the water line enters your property.
- It's usually a brass device with a number of ports (called test cocks) rising from the top.
- If the date on the tag is more than a year old, or almost at a year, it's time to schedule a test.
- Give us a call and we'll book you in for service with one of our certified testers.
- We'll handle everything from inspecting and replacing the tag to filing the paperwork on your behalf.
- Booking your appointment before the rainy season will put you at the top of our list so you aren't left waiting.
- Our technician will hook up a gauge to the test ports and check the internal pressure on each one.
- If a valve happens to fail, we may be able to fix or even rebuild it on the same service call.
- Once the backflow preventer passes, we'll add new tags and file the report with your water agency so they're aware.
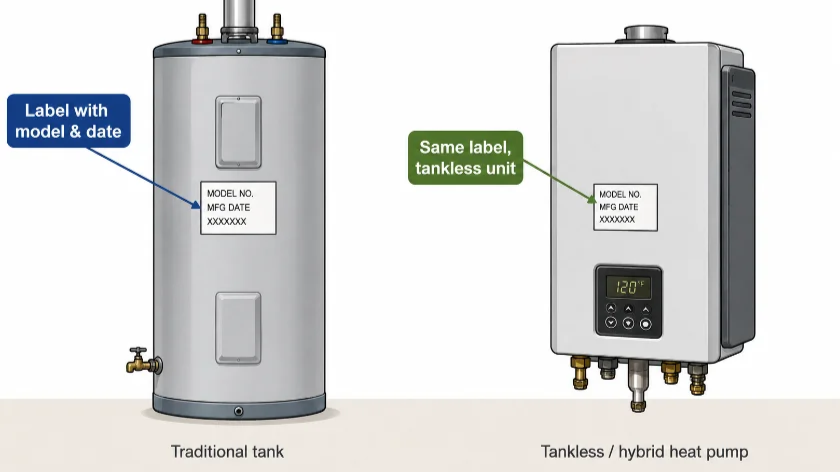
Your water heater runs in the background constantly throughout the year. Whether you have a traditional tank-based system, a newer high-efficiency tankless unit, or a hybrid heat pump model, the unit will still need regular inspections and maintenance to keep operating smoothly as time goes on. Here in the Bay Area, some neighborhoods struggle with hard water scale, sediment, and corrosion, which can damage the internals inside it and potentially force you into an early replacement. Changes in demand from guests or newcomers in the home can also leave you in a position where the unit can no longer keep up with demand. Scheduling a service call is the best way to avoid these headaches.
- Water heaters are typically installed in your garage, basement, or utility closet, but tankless units may be outside instead.
- You're looking for either a tall cylindrical tank (traditional) or a smaller wall-mounted box (tankless or hybrid heat pump).
- There should be a sticker or tag with the model number and brand on the door or the side of the unit.
- Make a note of any recent changes like new residents, long-term guests, or appliances.
- The technician first shuts off the power or gas to the unit, then closes the cold water supply feeding it.
- On a tank-based unit, they'll connect a hose to the drain valve and allow the water to completely drain out to a safe location next.
- They'll also inspect the anode element for any signs of corrosion or impending failure, like calcium buildup and rust.
- For tankless units, the main goal is to isolate the valves and inject a special descaling solution through the heat exchanger instead.
- The valve is rated to open automatically if either the water temperature or the internal pressure climbs too high, so the technician checks both.
- On a tank-based unit, they'll lift the valve's test lever briefly and let water discharge through the drain pipe to confirm it stops the flow of water.
- If the valve gets stuck in place, leaks, or won't reseat, they'll either repair or replace it on the spot.
- Tankless units have a slightly different valve setup, but are typically tested in a similar way.
- They'll also check the temperature to ensure it's safe and consistent (we recommend aiming for ~120°F-135°F).
- You can expect a tank-based system to last 8-12 years. Heat pump water heaters and tankless units last up to 20 instead.
- The technician will roughly estimate how much water you use each day, then compare it to the water heater's Gallons Per Minute (GPM) rate.
- If it's time for an upgrade for either reason, they'll walk you through your options based on your budget and needs.

Stand Up to Fall With Confidence with Caccia Home Services
The real payoff of scheduling inspections and taking care of your systems during the fall is the peace of mind that comes with it. Being able to enjoy your home without worrying about whether your sump pump will kick in during the next rainstorm or whether you’ll have enough hot water to go around is priceless.
Schedule a complete inspection with Caccia’s licensed plumbers is the best way to take your efforts to the next level. Whether you just need a quick certified test or you’re in the market for a pre-Thanksgiving water heater upgrade, we can help you find the best strategy for moving forward.
Just send us a message to get started.
Frequently Asked Questions about Fall Plumbing Maintenance
When should you schedule fall plumbing maintenance in the Bay Area?
Late September or early October is usually the best time, but generally speaking, try to take care of everything before heavy rain or the holidays move in. San Francisco’s official wet-weather season starts October 15, which gives most Bay Area homeowners plenty of time for inspections and repairs.
Can heavy rain cause a sewer backup even if your property doesn’t flood?
Absolutely. Rainwater can enter sanitary sewer systems through cracked pipes and improper connections, increasing the flow until sewage backs up into buildings. This is one of the reasons why we strongly recommend having the lines inspected at least every year or two.
Who is responsible for a damaged sewer lateral in the Bay Area?
In many Bay Area cities, the property owner is responsible for maintaining the private sewer lateral between the home and the municipal sewer main. Check with your city before arranging an inspection or repair to confirm or estimate your potential costs with our free Sewer Line Cost Estimator.
I’m having water pressure issues in my Bay Area home. What should I do?
The answer will depend on whether it’s too high or too low.
Static water pressure above 80 psi is considered too high under plumbing code, so if that’s the case for you, you might need a pressure-reducing valve. If the pressure is too low instead, you might just need a regulator, but you could also have a cracked pipe or issue somewhere deeper down the lines.
How do I shut the water off if I experience a fall flood?
Great question! Knowing where the main shutoff is located lets you stop the water quickly if a pipe bursts or a fixture begins leaking. Check out this video for a quick walkthrough.